How Much Does It Cost to Tank a Cellar — Complete Cost Guide and Factors to Consider
If your cellar or basement shows signs of damp, addressing it promptly protects your home from structural harm, mould and lost value. Tanking creates a waterproof barrier around walls and floors so the space stays dry and usable, preventing ongoing moisture problems and protecting stored items.
Costs vary with the size of the area, the severity of the damp and the tanking system you choose, so planning and a clear quote are essential. This guide explains typical price ranges, compares common tanking methods and helps you decide whether the investment will suit your needs and budget.
What is cellar tanking?
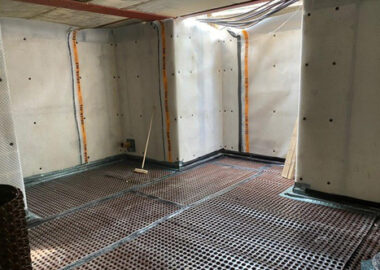
Cellar tanking waterproofs your basement by creating a continuous barrier on floors and walls, typically using a cementitious slurry or a flexible membrane. It stops damp and water ingress, making the space usable for storage or conversion into living areas. For older properties or those with persistent moisture, tanking provides a durable solution that protects finishes and reduces mould risk. Costs and methods vary with cellar size and condition.
Factors That Can Influence Your Cellar Tanking Cost
1. Cellar area and layout
The total floor area and shape of your cellar directly affect material needs and labour time. Irregular rooms, steps or alcoves add complexity and can raise the price per square metre.
2. Choice of waterproofing method
Different systems carry different price points and capabilities. A cementitious slurry is usually cheaper and suits minor damp, while a cavity drain membrane with channels and outlets costs more but handles heavier water ingress.
3. Severity of moisture and structural problems
If your cellar shows active leaks, cracks, or porous masonry, expect extra preparatory work such as repairs, wall strengthening or multiple protective coats. The worse the condition, the greater the additional expense.
4. Installation charges and contractor rates
Labour accounts for a large portion of the bill. Experienced, accredited specialists generally charge higher rates but reduce the risk of future failure and compliance issues. Regional differences in labour costs also affect quotes.
5. Extra components and finishing choices
Optional items increase total cost but improve performance and usability. Typical add-ons include:
- Underfloor drainage channels to relieve hydrostatic pressure
- Sump pump and automated discharge systems for flood-prone cellars
- Ventilation, dehumidifiers or plasterboard finishes to control condensation and make the space habitable
You should compare detailed quotes that separate materials, labour and extras so you can see which elements drive the price and where you can save.
Average Cost of Tanking a Cellar
Tanking costs depend on method and scope. Typical ranges:
- Tanking slurry: £40–£100 per m²
- Cavity drain membrane: £80–£150 per m²
- Complete cellar conversion: £10,000–£30,000
Your final price will vary with cellar size, condition and extras. Request an on-site survey for a tailored, written estimate.
Is Cellar Tanking Worth It?
Tanking your cellar protects the fabric of your home by stopping moisture that can cause rot, salt damage and crumbling plaster.
You gain usable space for storage or a habitable room, which can raise your property’s market appeal.
It also cuts mould risk and improves air quality, helping to safeguard items you keep downstairs.
Tanking a Cellar FAQs
How long will a tanking system keep your cellar dry?
A correctly installed tanking system typically protects a cellar for two to three decades. You can prolong performance with periodic inspections and by running a dehumidifier to control residual moisture.
How many days does a tanking job usually take?
Small, straightforward jobs can be completed in about 2–3 days, while larger or more complex cellars commonly take up to a week. Factors that affect timing include cellar size, preparation work, and the chosen waterproofing method.
Can you carry out cellar tanking yourself?
You can tackle tanking in small, simple spaces as a DIY project, but professional workmanship reduces the risk of mistakes. Incorrect application often leads to failure and more costly repairs later.
Will tanking eliminate every kind of damp?
Tanking stops water coming through walls and floors but does not remove condensation or poor ventilation issues. Combine tanking with adequate ventilation, dehumidification and drainage solutions for best results.
Frequently Asked Questions
What costs usually make up cellar waterproofing work?
Typical expenses include materials, labour, and preparatory works.
- Materials: waterproof membranes, cementitious slurry, tanking paints, drainage channels, and damp-proof courses.
- Labour: site preparation, applying coatings, installing drainage, and finishing.
- Additional items: waste disposal, minor structural repairs, and redecoration.
How wide is the price range for different tanking methods?
Prices vary by method and finish.
- Basic DIY materials: from around £5–£15 per m² for simple coatings or slurries.
- Professional tanking (labour + materials): commonly £100–£200 per m², depending on scope.
- Complex jobs (external excavation, full structural repairs): can rise above that range and be quoted per project.
Which elements most affect the final bill for cellar damp-proofing?
Several variables change cost directly:
- Extent of water ingress and required remediation.
- Choice of tanking system (internal membrane, cementitious, resin, or external waterproofing).
- Need for drainage, sump pumps or ventilation upgrades.
- Access, site complexity and local labour rates.
Might there be extra fees not included in the initial quote?
Yes — some charges may appear after the first estimate.
- Hidden costs can include unexpected structural repairs, rising damp treatment, or discovery of contaminated waste requiring specialist removal.
- Also watch for charges for scaffolding, permits, or specialist inspections if not stated upfront.
How do cellar dimensions and condition change the cost?
Size and condition scale the work and cost.
- Larger floors and taller walls increase material and labour.
- Poor condition (cracks, old render, ongoing leaks) requires more preparation and repairs, adding to cost.
- Tight access or awkward layouts raise labour time and handling charges.
How do DIY and professional approaches compare on price and outcome?
DIY lowers cash outlay but increases personal time and risk.
- DIY: cheaper materials-only cost; typical savings occur if you can do prep and application correctly. You risk improper installation and shorter lifespan.
- Professional: higher upfront cost but includes warranty, correct drainage design and guaranteed workmanship, which often proves more cost-effective long term.